

Homemade focaccia bread is the perfect blend of a crisp, golden crust and a soft, pillowy interior. Infused with high-quality olive oil and optional toppings like rosemary, this bread is a versatile addition to any meal. Whether you’re using it for sandwiches, pairing it with soups, or enjoying it on its own, focaccia’s rich flavor and texture make it a crowd-pleaser.

Grab This Chef Knife Now - Almost Gone!
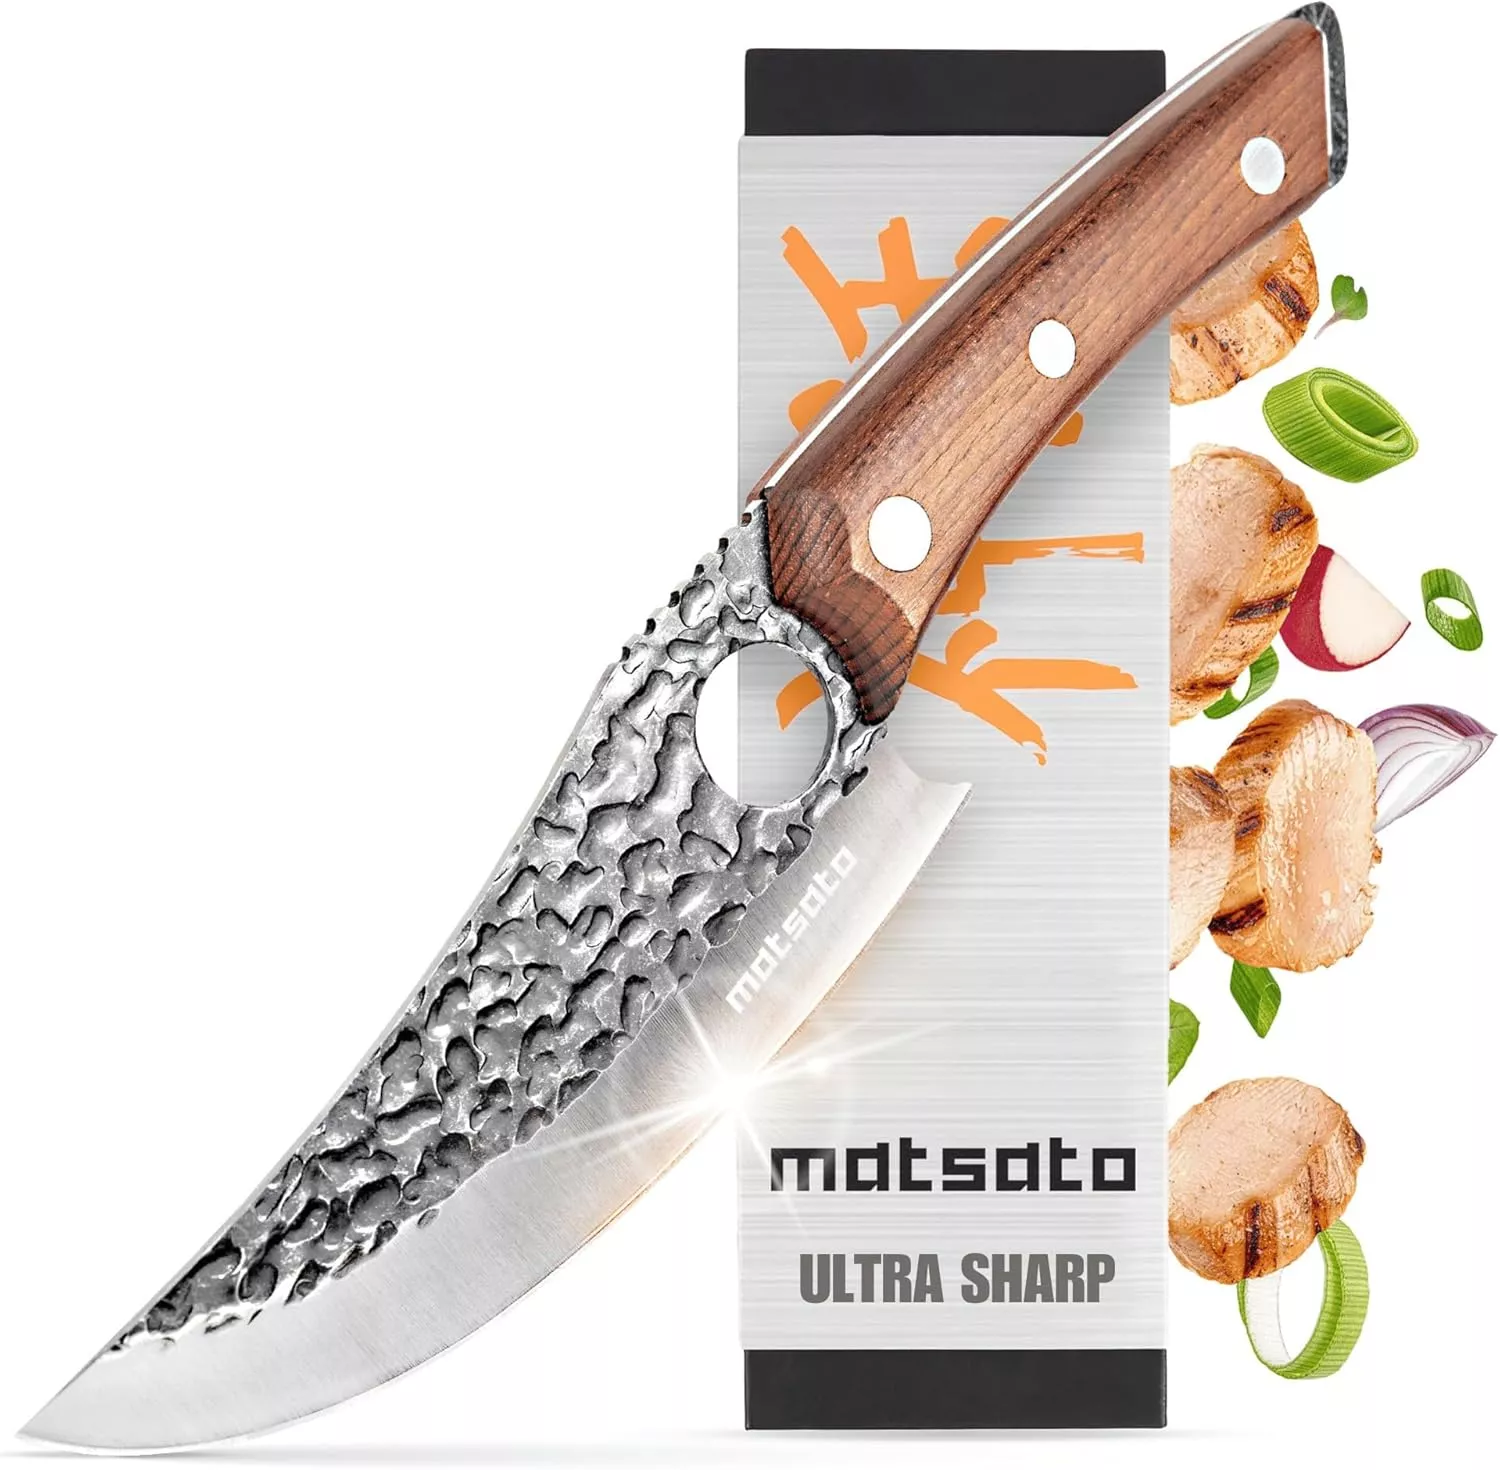
- Stays Razor-Sharp: Ice-hardened blade keeps its edge longer than ordinary knives
- Superior Grip Control: Unique finger hole design gives you perfect balance and safety
- Built to Last a Lifetime: Premium stainless steel blade with elegant beech wood handle
Customer Reviews ★★★★★
Why You’ll Love This Recipe
- Effortless Preparation: No complicated techniques or kneading required.
- Bursting with Flavor: The olive oil and slow fermentation create deep, savory notes.
- Versatile Uses: Ideal for dipping, sandwiches, or as a side dish.
Preparation Phase and Tools to Use
Essential Tools and Equipment
- Large Mixing Bowl: To mix and proof the dough.
- Wooden Spoon: For easy stirring.
- 9×13-inch Baking Pan: Ensures even baking and the perfect thickness.
- Plastic Wrap: Keeps the dough moist during fermentation.
- Metal Spatula: For removing the bread from the pan without damaging it.
- Measuring Cups and Spoons: For precise measurements that guarantee consistent results.
Why These Tools Are Important
- A well-mixed dough is the foundation of a light, airy focaccia.
- The baking pan and oil prevent sticking while ensuring an even bake.
- Proper measurements and tools reduce the risk of common baking errors.
Preparation Tips
- Water Temperature: Ensure lukewarm water to activate the yeast without harming it (combine 1 ½ cups cold water with ½ cup boiling water).
- Cold Fermentation: Allow the dough to rest in the fridge for at least 18 hours for maximum flavor development.
- Generous Oil Use: Prevents sticking and enhances the bread’s rich flavor.
Ingredients
Here’s everything you need for a delicious homemade focaccia bread:
- 500 g (4 cups, spoon and leveled) bread flour
- 7 g (2 1/4 teaspoons) instant yeast
- 2 teaspoons kosher salt
- 480 g (2 cups) lukewarm water (see tips above for preparation)
- 6 tablespoons high-quality extra-virgin olive oil, divided
- Flaky salt, for topping
- 1 tablespoon chopped rosemary (optional)
Step-by-Step Directions
1. Mix the Dough
- In a large mixing bowl, combine the bread flour.
- Add the yeast and kosher salt on opposite sides of the bowl to prevent direct contact initially.
- Use your fingers or a wooden spoon to mix the dry ingredients, then create a well in the center.
- Gradually pour the lukewarm water into the well. Stir until the mixture forms a wet, shaggy dough.
2. Oil the Dough
- Drizzle 30 g (2 tablespoons) olive oil over the dough.
- Use your fingers to gently spread the oil across the dough’s surface.
- Tilt the bowl slightly to coat the sides and bottom with oil.
- Cover the bowl tightly with plastic wrap and refrigerate for at least 18 hours (up to 72 hours for enhanced flavor).
3. Prepare the Baking Pan
- Spray a 9×13-inch baking pan with non-stick cooking spray.
- Pour 30 g (2 tablespoons) olive oil into the center of the pan, evenly spreading it around. Set aside.
4. Shape the Dough
- Remove the dough from the fridge. It will be soft and bubbly.
- Using your hands, gently pull the edges of the dough toward the center while rotating the bowl to form a loose ball.
- Transfer the dough to the prepared baking pan, turning it a few times to coat the entire surface in oil.
- Leave the dough uncovered and allow it to rise in a warm, draft-free place for 3–4 hours, or until it nearly fills the pan.
5. Preheat the Oven
- About 30 minutes before baking, preheat your oven to 425°F (218°C).
6. Create Dimples and Add Toppings
- Drizzle the remaining 30 g (2 tablespoons) olive oil over the dough, spreading it evenly with your hands.
- Optionally, sprinkle the dough with chopped rosemary.
- Use your fingertips to press straight down into the dough, creating deep dimples across the surface. This step traps the oil and toppings, ensuring they bake into the bread.
- Sprinkle flaky salt on top for extra flavor and crunch.
7. Bake the Bread
- Place the pan in the preheated oven and bake for 25–30 minutes, or until the bread is golden brown and pulls away slightly from the edges of the pan.
- Let the focaccia cool in the pan for 5 minutes. Carefully transfer it to a wire rack to cool further and prevent a soggy bottom.
- Allow the bread to cool for at least 10 minutes before slicing and serving.
Notes
- Toppings: Customize with your favorite flavors—try olives, sun-dried tomatoes, or garlic for a unique twist.
- Storage: Store leftovers in an airtight container at room temperature for up to 2 days.
- Lukewarm Water: Achieve the ideal temperature by mixing 1 ½ cups cold water with ½ cup boiling water.
Serving Suggestions
Focaccia bread is versatile and pairs wonderfully with a variety of dishes. Here are some delicious ideas to elevate your meal:
- Dipping: Serve with olive oil and balsamic vinegar for a classic Italian appetizer.
- Sandwich Base: Use slices of focaccia to create gourmet sandwiches with grilled vegetables, meats, or fresh mozzarella.
- Soups and Stews: Pair with creamy tomato soup, minestrone, or a hearty beef stew.
- Pasta Companion: Serve alongside rich pasta dishes like spaghetti bolognese or creamy fettuccine Alfredo.
- Mini Pizzas: Top slices with marinara, mozzarella, and pepperoni for quick mini pizzas.
- Salads: Complement fresh salads like Caesar, arugula, or Caprese with warm focaccia.
- Antipasto Platter: Add focaccia to a platter of cured meats, cheeses, and marinated vegetables.
- Topped Focaccia: Serve as an appetizer topped with caramelized onions, olives, or roasted garlic.

Common Mistakes to Avoid & How to Perfect the Recipe
Avoiding common pitfalls ensures your homemade focaccia bread turns out perfect every time:
1. Under-Proofing the Dough
- Mistake: Not allowing enough time for the dough to rise fully.
- Solution: Ensure the dough has time to double in size during the second rise. Patience is key for a light, airy texture.
2. Skimping on Olive Oil
- Mistake: Using too little oil can result in sticking and dry bread.
- Solution: Be generous with olive oil in both the pan and on the dough. It enhances flavor, prevents sticking, and promotes a golden crust.
3. Over-Baking
- Mistake: Baking too long can dry out the bread or burn the crust.
- Solution: Check the focaccia at the 25-minute mark. It should be golden brown and pulling away from the edges of the pan.
4. Neglecting the Dimples
- Mistake: Skipping this step can lead to uneven baking and prevent toppings from adhering.
- Solution: Press deep dimples into the dough to hold olive oil and toppings, ensuring even flavor distribution.
5. Using Water That’s Too Hot or Too Cold
- Mistake: Incorrect water temperature can kill the yeast or slow fermentation.
- Solution: Use lukewarm water (combine cold and boiling water as described in the notes) to activate the yeast.
6. Skipping the Cold Fermentation
- Mistake: Rushing the process by skipping the refrigerator phase.
- Solution: Allow at least 18 hours for the dough to ferment. This step is crucial for developing the signature focaccia flavor.
Side Dish Recommendations
Pair your focaccia bread with these complementary side dishes for a complete and satisfying meal:
- Creamy Tomato Soup: The rich, tangy flavor pairs beautifully with the bread’s soft, chewy texture.
- Mixed Greens Salad: A light salad with lemon vinaigrette adds a refreshing balance.
- Garlic and Herb Roasted Vegetables: Oven-roasted carrots, zucchini, and peppers enhance the rustic charm of focaccia.
- Caprese Salad: Fresh mozzarella, basil, and tomatoes drizzled with balsamic glaze make a perfect match.
- Antipasto Platter: Include cured meats, marinated artichokes, olives, and focaccia for a Mediterranean-inspired spread.
- Classic Marinara Sauce: A simple, warm tomato-based sauce makes for a great dipping option.
- Lemon and Herb Grilled Chicken: The tangy, smoky flavors of grilled chicken balance the rich bread beautifully.
- White Bean Dip or Hummus: Creamy dips provide a delightful contrast to the focaccia’s crisp exterior.
Whether serving as a standalone appetizer or a side to a larger meal, focaccia bread is the perfect addition to elevate your dining experience.

Recipe Tips for the Perfect Focaccia
- Topping Variations:
- Experiment with toppings like roasted garlic, caramelized onions, sun-dried tomatoes, or olives.
- Add shredded Parmesan or Asiago cheese for extra flavor.
- For Extra Crunch:
- Use Fresh Herbs:
- If using rosemary or thyme, fresh herbs provide a brighter flavor than dried.
- Prevent Soggy Bottoms:
- Transfer the focaccia to a wire rack after baking to allow airflow and avoid excess moisture.
Storage and Reheating Instructions
Storage:
- At Room Temperature: Store leftover focaccia in an airtight container or wrapped in foil for up to 2 days.
- In the Freezer: Wrap individual slices tightly in plastic wrap and place them in a freezer-safe bag. Store for up to 1 month.
Reheating:
- Oven: Preheat to 350°F (175°C), wrap the focaccia in foil, and heat for 5–10 minutes. This keeps it moist while warming.
- Toaster Oven: Use the toast setting to reheat slices for a crisp edge.
- Microwave: Wrap the bread in a damp paper towel and microwave for 20–30 seconds to soften, though this may affect the crispness.

FAQs About Focaccia Bread
1. Can I use all-purpose flour instead of bread flour?
Yes, you can substitute all-purpose flour, but the focaccia may be slightly less chewy due to the lower protein content.
2. Why does the dough need to ferment in the fridge?
Cold fermentation allows the dough to develop complex flavors and a more airy texture. It’s worth the wait!
3. Do I need to knead the dough?
No, this is a no-knead recipe. Mixing the dough and letting it rest develops the gluten naturally.
4. Can I make this recipe gluten-free?
Yes, use a gluten-free bread flour blend and ensure all other ingredients are gluten-free.
5. Why is my focaccia dense instead of airy?
This can happen if the dough is under-proofed or if the yeast is expired. Be sure to allow sufficient rising time and check your yeast freshness.
6. Can I skip the second rise?
No, the second rise is crucial for achieving the fluffy texture and letting the dough relax into the pan.
7. What’s the best way to serve focaccia warm?
Reheat it briefly in a 350°F oven or toaster oven before serving to restore its fresh-from-the-oven taste and texture.
8. Can I use active dry yeast instead of instant yeast?
Yes, but you’ll need to dissolve the active dry yeast in lukewarm water first and allow it to proof for 5–10 minutes before adding it to the flour.
Conclusion
Making homemade focaccia bread is a rewarding experience that transforms simple ingredients into a flavorful masterpiece. Its versatility allows you to serve it as an appetizer, side dish, or even the star of the meal. Whether paired with soup, salad, or dips, this bread’s golden crust, soft interior, and rich olive oil flavor will elevate any dining experience.
With the tips and detailed instructions in this guide, you can confidently bake a perfect focaccia bread every time. Experiment with toppings, customize flavors, and enjoy this Italian classic straight from your kitchen!

Easy Homemade Focaccia Bread
Ingredients
- 500 g 4 cups, spoon and leveled bread flour
- 7 g 2 1/4 teaspoons or 1 standard packet instant yeast
- 2 teaspoons kosher salt
- 480 g 2 cups lukewarm water (see notes for preparation)
- 6 tablespoons high-quality extra-virgin olive oil divided
- Flaky salt for topping
- 1 tablespoon chopped rosemary optional
Instructions
Mix the Dough:
- In a large bowl, combine the bread flour. Add the yeast and kosher salt on opposite sides of the bowl to prevent direct contact initially.
- Use your fingers to mix the dry ingredients together, then create a well in the center.
- Pour in the lukewarm water and stir with a wooden spoon until a wet, shaggy dough forms.
Oil the Dough:
- Cover the bowl tightly with plastic wrap and refrigerate for at least 18 hours, up to 72 hours.
Prepare the Baking Pan:
- Spray a 9×13-inch baking pan with non-stick spray and drizzle 30 g (2 tablespoons) olive oil in the center of the pan. Set aside.
Shape the Dough:
- Remove the dough from the fridge. Use your fingers to pull the edges of the dough towards the center while rotating the bowl, forming the dough into a ball.
- Transfer the dough to the prepared baking pan, turning it a few times to coat the entire surface in olive oil.
- Leave the dough uncovered to rise in a warm, draft-free place for 3-4 hours, until it nearly fills the pan.
Preheat the Oven:
- Towards the end of the second rise, preheat the oven to 425°F (218°C).
Dimples and Topping:
- Drizzle the remaining 30 g (2 tablespoons) olive oil over the dough. Rub it over the surface, then sprinkle the chopped rosemary (if using) evenly.
- Use your fingers to press straight down into the dough, creating deep dimples all over. Gently stretch the dough to fill the corners of the pan, if needed.
- Sprinkle flaky salt over the top.
Bake the Bread:
- Bake for 25-30 minutes, or until golden brown and pulling away from the sides of the pan.
Notes
Toppings: Customize with your favorite herbs or toppings like olives, sun-dried tomatoes, or garlic.
Storage: Store leftovers in an airtight container at room temperature.


Leave a Comment